

Add custom fields to clients
Keep the information your business needs about each client — a note, a date, a number, an option from a list, an image or a file — by adding your own fields to the clients list, without code.
The client form asks for what every business needs: a name, a phone, an email, the fiscal data. Yours probably needs something more — a contract date, an internal number, a route picked from a list, a photo of the storefront, a signed agreement. Custom fields let you add exactly those to your clients, and from then on they appear in every client's form.
Each team has its own fields. The fields you add belong to the team you are working in: nobody in another team sees them, and nothing another team adds, renames or deletes reaches yours. Two teams can even use the same field name for different things.
Who can add them
The Custom fields button appears on the clients list, under Catalogs → Clients, for anyone who can create or edit clients — Create Client or Update Client. There is no new permission to grant. Someone who can only see clients does not get the button, but still sees the values the others filled in.
Add a field
-
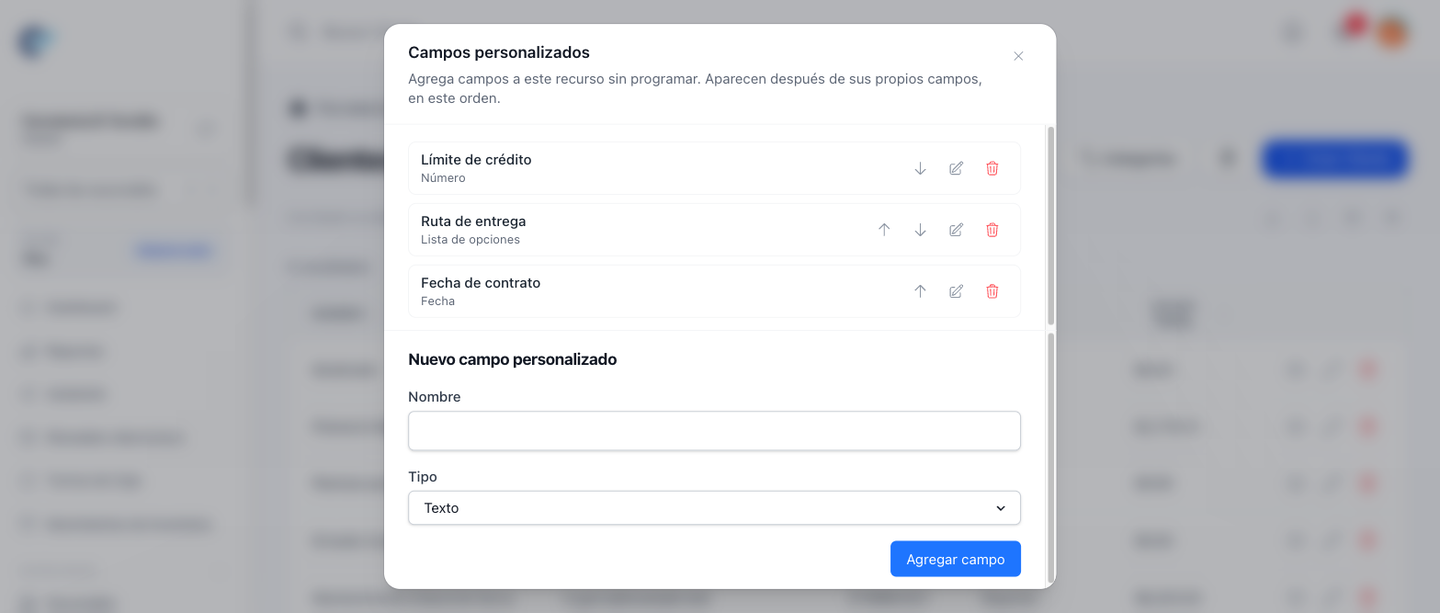
Open Clients under Catalogs and click Custom fields in the bar above the table.
-
Under New custom field, write the Name. It is the label the form shows.
-
Pick the Type:
Type What you capture Text A line of text Number A number Date A date List of options One option picked from a list. Write the options in Options, one per line Image A picture File Any kind of file — a PDF, a spreadsheet, a document -
Click Add field. It joins the list above the form.
Two fields of your team cannot share a name, and names that differ only in capitals, spaces, accents or punctuation count as the same name: Delivery route and delivery-route are refused as repeated.
When you close the window, the page reloads so the list and the forms show the change.
Order, change and delete them
In the window's list:
- The arrows move a field up or down. The form shows the fields in this order.
- The pencil loads a field into the form below; change it and click Save field, or Cancel to leave it as it was.
- The trash can deletes the field.
Deleting a field, or changing its type, takes it out of the form and the columns, but the values your clients already have are kept. Create a field with the same name again and they come back. Renaming works the same way: the new name starts empty, and the old values stay kept under the old name.
Before you delete, rename or retype an Image or File field, the window asks Delete the stored files?:
- Delete files deletes that field's files from your team's clients, in the background, including clients in the trash. When you changed the type or the name, the field is also left empty in those clients, so it does not keep pointing at a file that no longer exists.
- Keep files applies the change and leaves the files where they are.
- Cancel changes nothing.
Either way, only your team's clients are touched.
Fill them in
Create or edit a client: the custom fields appear after the client's own fields, in the order you set. None of them is required, so a client can be saved with any of them empty. A client created before the fields existed opens and saves normally, with the fields empty.
On the client's page they are shown in their own Custom fields panel, after the client's details and fiscal data and before their sell orders, payments and quotations.
An Image field shows the current picture with a Remove image button, and an Upload Image button (Replace image once there is one). A File field works the same way, with Remove file, Upload File and Replace file, and shows the current file with its name; click it to open the file.
- Choosing a file only selects it. It is stored when you save the client.
- Remove image or Remove file marks it to be removed when you save; Undo keeps it.
- Replacing or removing a picture or a file deletes the old one.
Where images and files are kept
A picture or a file uploaded to a client is stored in the media library of whoever uploads it, and counts against that person's space. You find yours under Media in your account, inside the Clients folder, with one subfolder per client named after its number. When your space is already used up, the client is not saved: free some up by deleting files you no longer need, or get more space, and save again. Space, in your account, shows how much you have left.
Sending a client to the trash deletes the pictures and files of its custom fields straight away. If you restore the client, its details come back but those pictures and files do not: the fields keep a link to a file that no longer exists, and you upload them again.
Show them on the list
Every custom field is offered, unchecked, in Visible columns, the window the columns button of the clients list opens. Tick it to show it as a column. These columns are read only: the list cannot be sorted or filtered by them. An image field shows a small thumbnail; a file field shows its name, linked to the file.
The columns you choose are remembered for you, separately in each team.
Export and import them with Excel
A custom field column you show is exported with the list, and the same file can be imported back with the list's Import button: each custom field column fills that field.
- An empty text, number, date or list cell leaves the field empty.
- A file without a field's column leaves that field as it was.
- In an image or file column, the link the client already has keeps the file as it is, so exporting and importing back never duplicates anything. Any other link is downloaded and stored in your media library, replacing the previous file; a link that cannot be downloaded marks that row as an error, and the row saves nothing. An empty cell keeps the current file.